Many destinations around the world have impressive architecture nearby to photograph. Nearly all the major cities have buildings with distinctive features. Research before you go will save you time once you get there, as well as help you determine what you want to see. Make sure you have directions or maps to the areas you want to visit.
Take Numerous Photos

When you visit a location that is a once in a lifetime visit, make sure you take lots of architectural photographs. Approach buildings from all angles and maybe even at different times of the day. Make sure you take enough memory cards so that you can take as many images as you want. The image of the Coliseum in Rome is a classic angle and shot, taken during the day. What happens if you go back to the same spot at night?
Think Outside of the Box
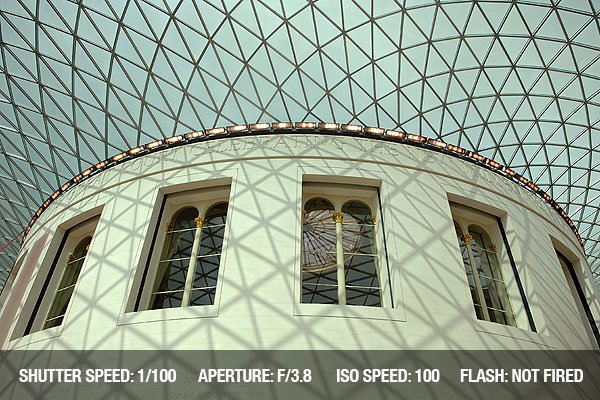
Whenever you are photographing architecture, think outside of the box. Try to find different perspectives and areas to photograph. Always look at the roof of the building you are in to see if you have something attractive above your head. Tilt your camera up and use an aperture appropriate to the image; if you cannot use flash, open the aperture to around f/4. If you have a glass ceiling, underexpose the camera slightly to retain the dark detail.
Check the Composition

Putting some thought into composition is important in architectural photography. Always look for interesting angles and perspectives whenever possible. Think about your rule of thirds, then how you can break them. For example with a spiral staircase, rather than composing the photo from the ground, why not climb to the top. If you are hand-holding your camera, choose an ISO of 400 and rest your camera on the ledge securely.
Try Different Viewpoints

Do not shoot an architectural image from your eye level, as this will only show it as a flat object in the photo. Try to capture a subject from various angles at different viewpoints. You can also move the camera to your left and right, or a little higher and lower than eye level to add some creativity to your photographs. Using a tilt-shift lens, you can take an architectural photograph that will show a tall building in a totally straight up and down position.
Zoom in for Details

Zooming in to create a detailed close up shot is a great way to bring attention to smaller parts of a building. For example, you can shoot the doorknobs, windows, and brick work of a monument or building, or the zigzag patterns and the curving lines of classic spiral stairways. Use an ISO of 400 and a fairly wide aperture to let adequate light in. Underexposing by one stop can keep the detail and color in the image.
Take Photos at Night

Taking photos of architecture at different times of the day creates a new feel and effect in each picture. If your subject is a church for example, you can capture a more interesting image at dusk or dawn. Alternatively if your subject is a well lit building at night, use a tripod and find an interesting angle. Place your camera on a tripod and choose the lowest ISO possible. If you choose an aperture of around f/32 for a super sharp image you will get an exposure time of around 10 seconds. If you need to handhold the camera, open the aperture to the max and find a support, be it a wall or beanbag to place your camera on and take the shot.
Shoot in Black & White

When photographing architecture in black and white, think about strong lines and patterns as this will create an abstract effect. Look for lines that draw the eye towards a center or focal point, like this image of the Brooklyn Bridge. With black and white, you can worry less about a dull sky, but using a red filter or a polarizing filter will always help draw out the contrast between the dark and light areas.
Recommended Settings
The ideal settings will vary depending on the subject and conditions. It is always preferable to use a tripod where you can. If there isn’t enough light, use the widest aperture possible. On a bright day underexpose the image by one or two stops – doing this retains the detail in the architectural image, and it’s even more important if you want to be able to zoom in and see the details later on.
Recommended Equipment
If shooting on a bright day, it is always useful to have a polarizing filter, which helps reduce reflections and brings out colors. Use a lens hood, which keeps glare out. If you are using a wide angle lens, glare is a common problem. A tripod is always useful so you can use a low ISO and smaller aperture, giving sharper architectural images that can be enlarged. Remember to take lots of spare batteries and memory cards with you.
Conclusion
Architectural photography is something that produces timeless images. Always think about lines and shapes, and look for patterns and colors. Remember you can convert any image to black and white later so look for images that are full of shadows and highlights. A building is a static thing and you need to move around it to find new perspectives and approach it as if it were full of life and character.